This is a technical guide on how to wire in an aftermarket radio in a 2018 WRX Premium
General Notes:
- XAV-AX100 does not have AUX Inputs
- 2018 WRX with 2 USB ports won’t work unless OEM USB module is swapped to one with single USB port.
- OEM Subaru Microphone is not compatible with any aftermarket head unit. Use microphone supplied with Sony system.
Tools:
- VISE-GRIP wire stripper and crimper
- misc wire 14-20 gauge (preferably 16AWG)
- Tesa 51608 tape – Noise free electrical tape, reduces vibrations, doesn’t leave residue
- If using Crimp method
- If using Solder method (recommended)
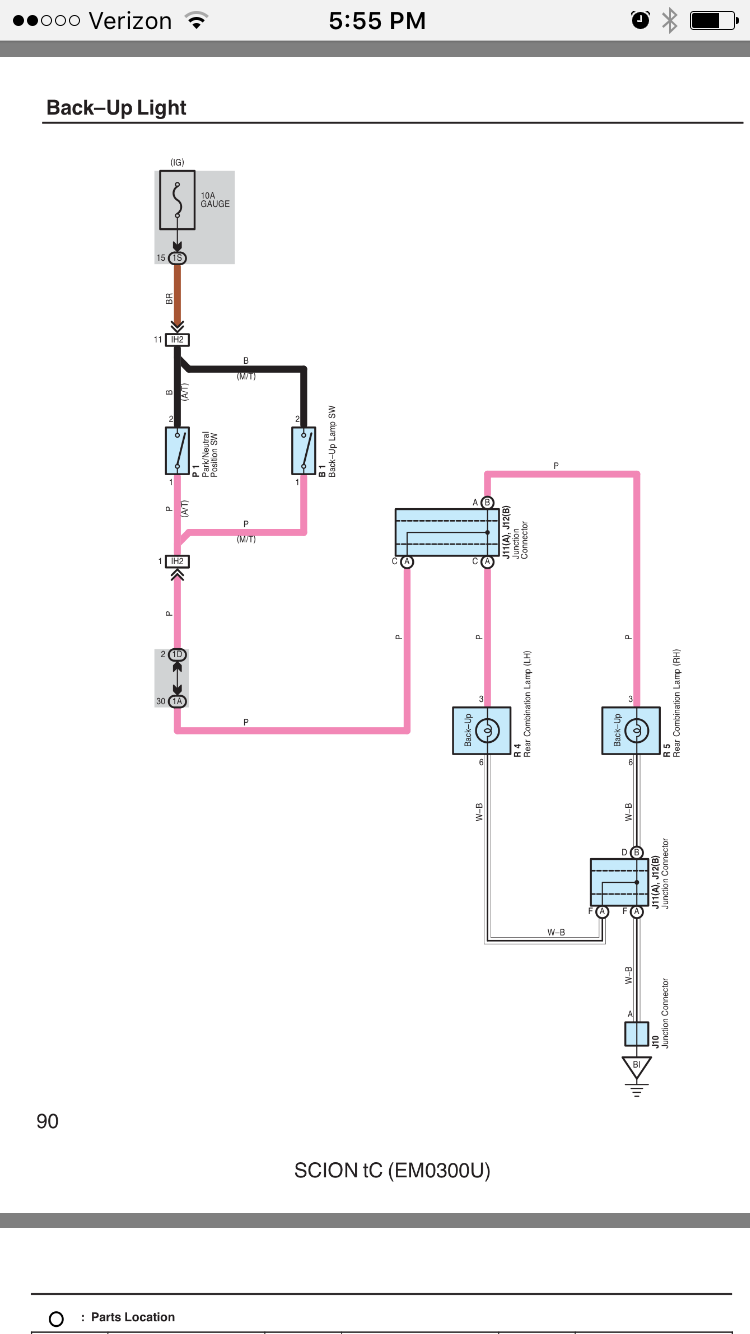
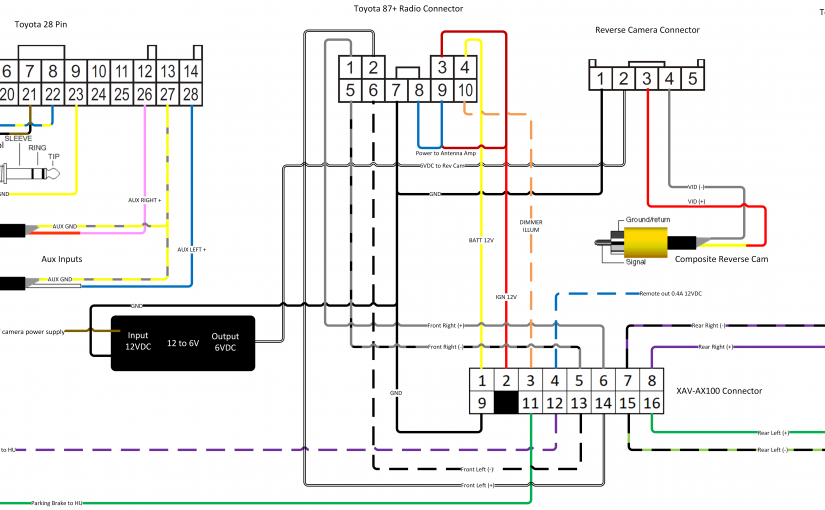
Wiring Diagram

What isn’t shown
- USB Connector
- Antenna Connector
Basic Functionality
- Sony XAV-AX100 (duh). Other compatible models include XAV-AX200, and XAV-AX5000 (wiring harness is identical)
- Scosche SU2031B Dash Kit Gloss Black – not cheap, but fits better than Metra 95-8907HG
- Metra 40-LX11 – adapts the subaru/lexus/toyota/scion square antenna to the round motorola type. Extra blue wire hanging off is not used. clip off.
- Metra 70-1761 – main harness, power, front rear speakers. Simply match colors from sony end to Metra end, and (preferably) solder, properly crimped butt connectors also work.
Adding more functionality
AX-SUB28SWC-6V – subaru/toyota/lexus/scion use a standard 28 pin connector.
This connector has the capability to provide:
- reverse camera video and power
- aux input
- steering wheel control (2 banks of resistors)
- vehicle speed sense (Pulse)
- parking brake sense (GND activated)
- reverse gear sense (+12V)
- CANBUS
- powered microphone power and audio
However not all features are available in the WRX, as some pins are missing.
The AX-SUB28SWC-6V requires modification to work with the WRX.
This is the only option available for retaining steering wheel control and backup cam. Out of the entire install, this part gave me the most trouble because the connector had to be re-pinned.
Luckily I made a diagram that should help you figure out what goes where.
When it was all said and done, I only needed 5 of the pins in the 28 pin connector:
- Reverse Trigger
- Parking Brake
- SWC Ground
- SWC Bank 1
- SWC Bank 2
Also note: the Metra connector is fragile, do not force in.
Steering Wheel Control
The black connector end of the AX-SUB28SWC typically connects to a Metra Axxess ASWC-1 can be chopped off, because the XAV-AX100 is capable of reading the signals directly from the steering wheel via pins 21-23 on the 28 pin connector
Pins 21-13 can be soldered/crimped directly to the 3.5mm jack, then connected to the “remote” port on the XAV-AX100 (see wiring diagram)
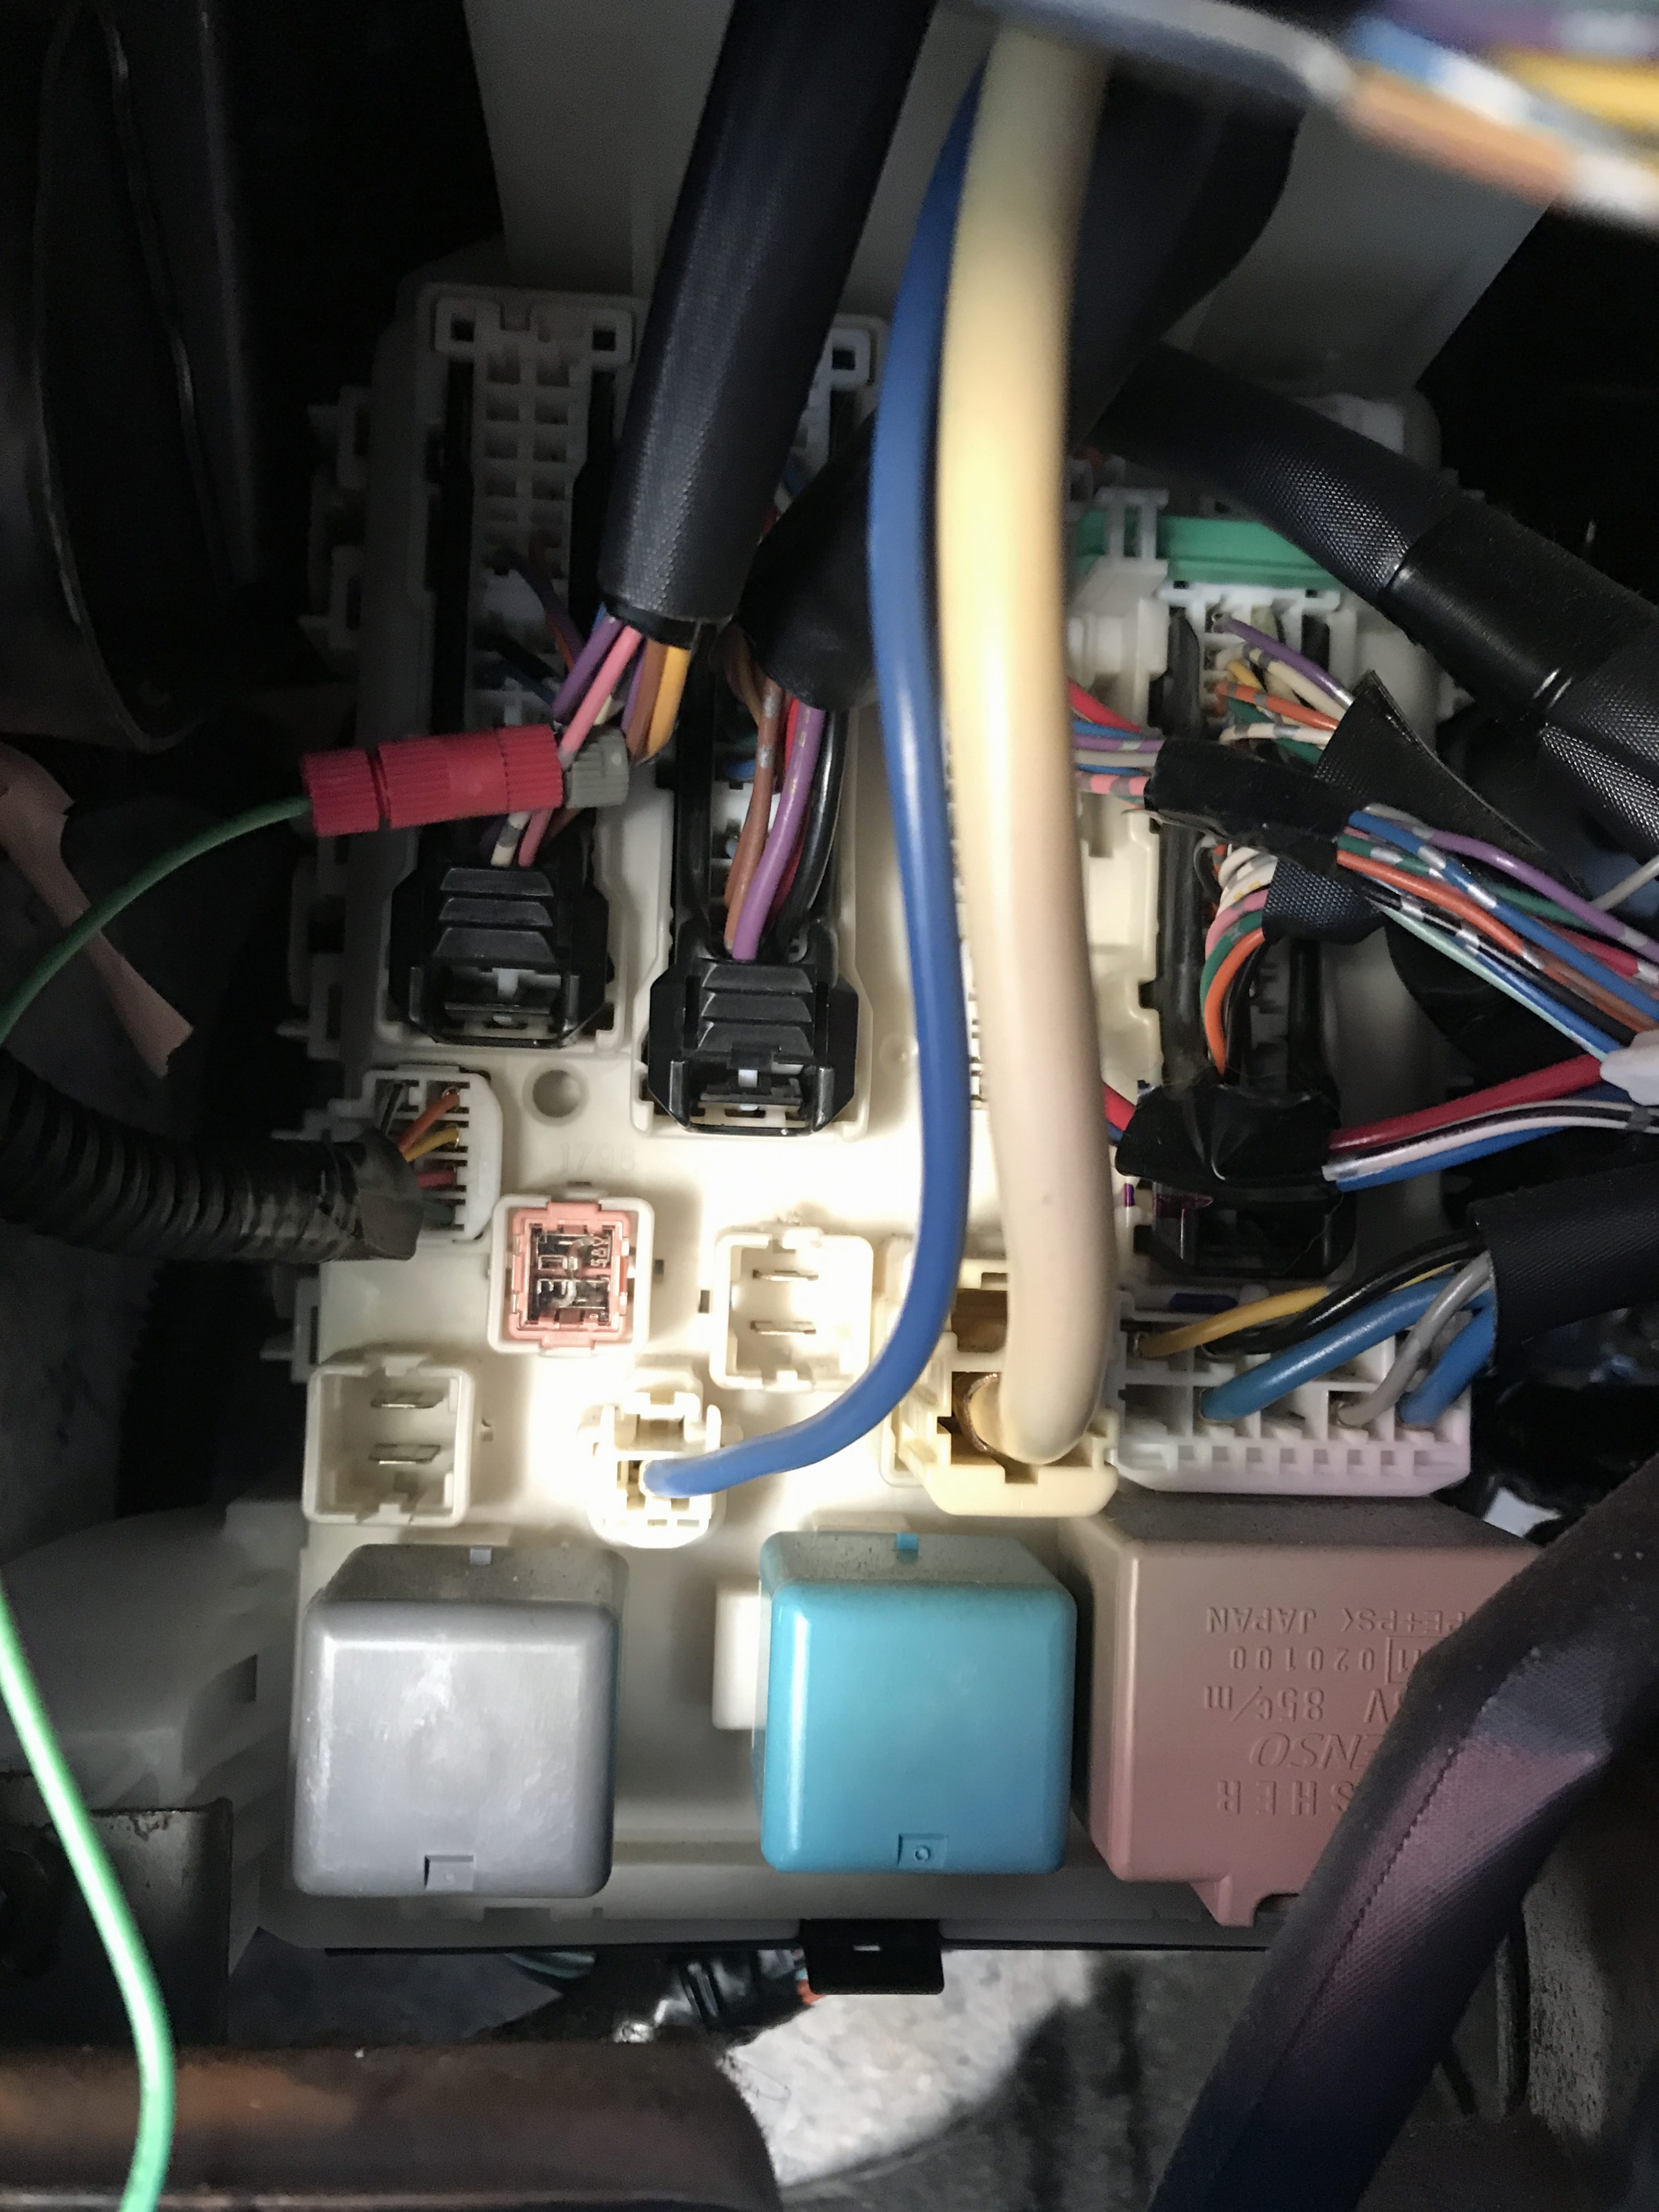
Backup Camera
the WRX backup cam requires 6V. The AX-SUB28SWC-6V includes a 12 to 6V converter for this purpose.
When shifted into reverse, pin 2 of the 28 pin connector is given 12V. That 12V is sent into the 12to6 adapter, and 6V gets sent out to power the reverse camera.
The 2018 WRX Premium uses a 5 pin connector for backup camera video and power, instead of the 28 pin (as is common in other Toyotas)
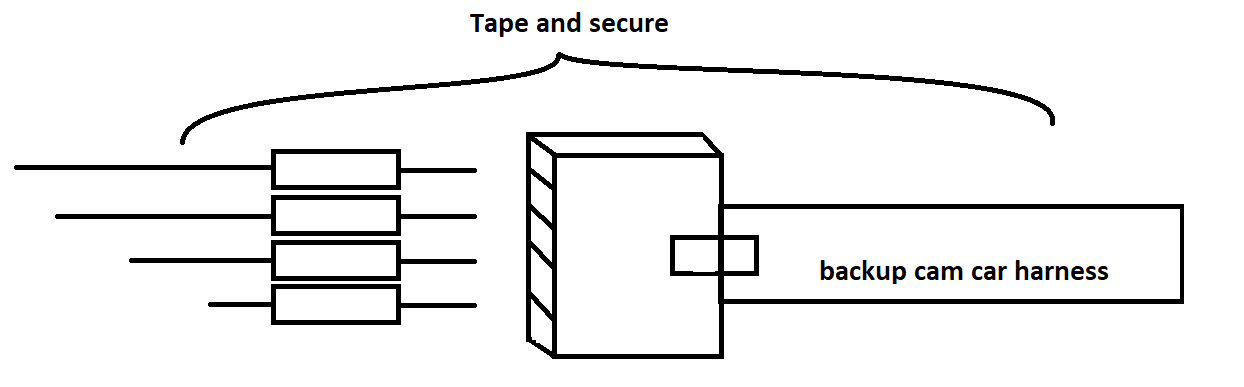
If yours uses the 5 pin, there is no known wiring harness you can buy to adapt the backup camera. We must make our own with breadboard jumpers.
Take 5 of those wires, and cut and strip them, the bare wire side will be soldered to:
- Ground
- 6V in (from 6V out on the 12to6 converter)
- VID (+) (RCA Shield)
- VID (-) (RCA Center)
- Not used
stick them into the OEM camera harness and tape (see wiring diagram for detailed info)
USB Ports
AX-SUBUSB2 Converts a standard male USB connection to the subaru connector found on the OEM harness. This allows you to use the OEM usb ports in your car, with an aftermarket stereo.
(This only works out of the box with WRX’s with a single USB port in center console)Newer WRXs have 2 USB ports and have a builtin USB hub. Since Android Auto/CarPlay is not compatible with USB hubs, a single Aux/USB combo module from 15-17 WRX can be swapped in, if needed. (video coming soon)
Aftermarket Door Speakers
Metra 72-8104 – door speaker, minor modification to plastic adapter required to get proper fitment
Screws (3 per door). OEM screws that connect speaker to door, have too large of a head to accommodate the Metra 72-8104. Any hardware store will carry a screw with a smaller head that won’t interfere with the speaker adapter. (these are not machine screws, they have pointed tips, they go into the plastic inserts in the door)
Speaker Foam – Creates a seal between the speaker frame and plastic Metra adapter to prevent vibrations.
Dynamat (recommended) – Stick inside door panel, reduces vibrations, gives door speakers more bass, and makes interior quieter
Steps Afterward
After you get everything running you’ll want to do a couple things:
- Test the backup cam by going into reverse
- Turn off the ugly proximity lines in the head unit settings.
- Program steering wheel controls in custom mode
- Customize your XAV’s wallpaper
- Firmware update your XAV
- Make sure all FM stations are coming in, (test fringe stations to check if the antenna amp is working)
- Load up android auto and check if the parking brake sensor works
- turn on/off your headlights to see if the illumination/dimmer wire works.