I oftentimes see people asking why there is so much interference on their SDRs. Most visible interference is in fact not caused by real signals, but caused by the RTL dongle overloading.
Eliminating visible interference
The first to troubleshooting interference is turning off any type of AGC. AGC maxes out the gain slider which makes nearby strong signals to appear where they shouldn’t be.
37.2 dB is a good level
Turning on and off AGC, Manual Gain 37dB
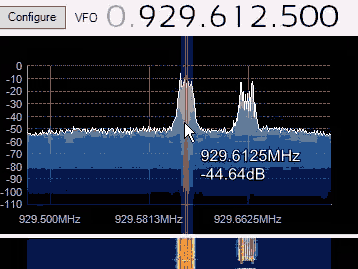
Change your sample rate. Understanding the sample rate is quite easy. 0.25 MSPS will only show 250khz of spectrum on your waterfall/FFT screen.
It isn’t recommended to use 0.25 MSPS because this can cause interference on frequencies every 250KHz. Take for example, a frequency on 850MHz and 850.250MHz. If you set your sample rate to 0.25MSPS, and either the signal is too close, or your gain is too high. Both 850MHz and 850.25 will mix causing bad decodes. The same can be found up to 10 iterations of 250KHz past the original signal. To see this, find a strong signal, set your gain high. Center it on your waterfall/FFT display, and increment the frequency by 1MHz. You will see the same signal every 1MHz, slowly decreasing in strength as you increase the frequency. Now use 2.048MSPS, you will notice mirrored interference every 2.048MHz
250KHz interference, 929.6125 MHz signal
.9000001 MSPS is recommended for digital modes because it provides a small enough chunk of spectrum for visually inspecting the signal, and it doesn’t cause even overlaps. So instead of 849MHz, 849.5 849.75 interfering with 850MHz, interference will only occur every 900KHz, which has a lesser chance of overlapping interference.
How to eliminate real interference
Real interference is caused by any type of RFI near your SDR receiver. Simply moving the dongle and antenna away from the source of noise (computer, TV. AVR) will lower interference.
To go even further, you can add a ferrite core, or an RF shielded case around your SDR to block unwanted signals.
A few months ago I wrote a simple script in batch that allowed me to record each call in MP3 format with the TGID, RID, date recorded, into a folder that contained the proper year/month/date.
It’s still a little buggy, there are much better ways of doing this.
But what I recently did was make a web front end to read the folders and files, then spit out a table with all the data.
Right now it’s not very efficient, but I plan on fixing that by migrating from, a loop that scans every file from a directory, to a database application. I’ll be using a program called Everything Search by Void Tools. I chose this because it has an extremely fast indexing engine and a command line interface.
This should speed up my page load times by a lot. With my current setup a query takes about 5 seconds, with a directory that has a month of calls, 26,000 files, and almost 1GB of file space taken. If I don’t make this change, page load times will only increase.
I hope to be done with this migration by the end of the week.
This is the method I used. I didn’t feel like paying for Clockworkmod tether, so I found a solution that is almost identical, with alternate software.
No root needed
I’ve tested this with my Nexus 5 running 4.4.2
The problem: Using the stock tethering method, only redirects you to the T-Mobile page where they advertise their tethering option. By default you can’t access any other internet site.
How they do this: T-Mobile counts the hops to their servers using the TTL function, if an extra hop appears, T-Mobile will assume you are tethering without permission.
On your phone: Get Proxoid Go into your settings>More>Tethering & Portable hotstpot, check the box that says “Portable Wi-Fi Hotspot” Take note of the Wi-Fi password Open Proxoid and check the ‘Start’ box
On your computer: Connect to the Wi-Fi Network, and enter the password noted previously Open a command prompt and type ipconfig Look for the default gateway for your current Wi-Fi adapter (usually 192.168.43.1) Take note of this IP address
Checking if the connection works: In command prompt type ping (ip address) e.g. ‘ping 192.168.43.1’ The response should not time out Close the window
For firefox: Go into Settings>Network under connections, click “settings” Select manual proxy configuration In HTTP proxy, Address: (IP noted earlier) Port: 8080 Check the box that says “Use this proxy server for all protocols” Click OK
This article is meant to go with my video, but the video I have is older than the steps I show here. Follow this tutorial, but use my video if you want to know how specific programs work. (don’t follow the video, just watch it)
Note: Lots of things are changing rapidly in the areas of SDR, especially the $9 RTL-SDR’s So What I say today, could change tomorrow. That said, I will provide as much detail as I can, and will list the versions of software I use.
Requirements
Intel 2nd generation Core i5 or better (AMD processors have been untested)
You need to at least somewhat know how to work SDR# and UniTrunker. I suggest you play with some analog stuff and get familiar with the UI before getting into advanced things, or else you’ll tear your hair out.
Rick (Developer of UniTrunker) has implemented RTL-SDR INTO his program, so we don’t have to use this setup in theory, The latest preview build of Unitrunker has RTLSDR tuning support built in (no need for SDR#) but audio decoding isn’t too great, I still suggest using the tutorial below.
Virtual Audio Cable uses lots of CPU resources, even if it doesn’t seem like it. It seems VAC works well on some machines, and bad on others. My latest videos show decoding being done on a desktop with a core i5 4670K. I know this setup works with my hardware, and you can replicate my build for ~$300(used). Decoding varies a lot from PC to PC, and is generally not recommended on PC’s older than 2008.
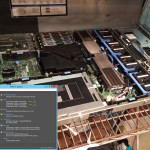
Lets go through how this setup works. Below is a picture to familiarize yourself with what’s happening.
You have 2 USB Dongles with a (special)driver loaded that allows you to communicate directly with the chip inside the dongle. The chip controls the frequency at which you listen to. If you tune it to 100MHz for example, you’ll see the end of the FM broadcast band (87-108MHz)
SDRSharp and UniTrunker can utilize this driver to feed audio into their programs. When you listen to trunked audio, you have to have at least 2 receivers. One receiver is dedicated to listening to the control channel, the other listens to the voice channel. In this setup UniTrunker will listen to the control channel from SDR#1. Control Channels send data like, who’s talking, who joined the network, what the frequencies of the channels are, and how many channels there are. Control channels usually transmit 24/7, so they are easy to pick out in a waterfall display. Unitrunker reads this information into a nice window like this.
This window will only pop up when UniTrunker has detected a compatible radio system
Now lets talk about DSD. All DSD does is listen to Virtual Audio Cable for audio it can decode. Think of Virtual Audio Cable as the pipes that send audio from one program to another.
SDRSharp gets its orders from a plugin “Zefie’s Mod”
Zefie’s Mod is a 2 part plugin, it requires the installation of VC++ REDIST. Part one emulates a radio interface in UniTrunker. This is shown here
Part 1 is also known as remote.dll
Part 2 is a plugin for SDRSharp, It takes orders from remote.dll via a file called sdrsharptrunking.log. Sdrsharptrunking.log contains the current channel you should be listening to.
This is what the plugin looks like
Unitrunker tells the debug receiver to listen to a channel, the debug receiver writes the file called sdrsharptrunking.log, Zefie’s Mod SDRSharp plugin listens for that file, and tells SDRSharp to change its frequency based on the file.
This is currently the only way to listen to the voice channel. In analog trunked systems, you can directly listen to the output audio without the use of DSD. But if your system uses P25 CAI you will need to decode the audio, otherwise you’ll just hear weird noises any time someone talks.
DSD is a program that decodes a number of digital voice protocols. It’s still experimental and has bugs. As of version 160 it does not support P25 Phase II, but support is currently being worked on here. By default, DSD is not very good at decoding audio, It tries to guess what type of signal it is receiving and sometimes its guesses cause the audio to break up. Command line switches are used to specify what type of signal it should be listening to. This will be discussed further, later on. DSD requires some DLL’s to work, and can only utilize the “default” audio in and output for Windows. The audio you hear out of DSD should be words that we can understand.
This contains a batch file that will download some components required for the program.
When the batch finishes, go into the folder that contains zadig.exe, and rename the folder to “VOICE“. Make another folder to contain your voice folder called “SDR“
Go ahead and right click “zadig.exe“, and run as Administrator
Look for a device called “Bulk-In, Interface (Interface 0)” There may be two
Select WinUSB as the target, and click “Install Driver“
If the driver install fails (usually on Windows 8), Select “Edit Name“, Rename the device to “Interface” and try the install again.
Driver installation should be successful, Check the second Bulk-In and make sure the second device has its drivers installed too.
You may close zadig now.
Installing Virtual Audio Cable
You can purchase, or find an alternative to “Virtual Audio Cable”
Go through the setup for VAC and open the “Control Panel” (blue icon with yellow cables)
Under “Cable Parameters” set “SR” to “22050 … 192000” and “NC” to “1 … 1“
We are lowering the fidelity of the cable to save CPU usage.
Click the “set” button
You may close Control Panel now.
Crossed out steps above have been found to be un-necessary.
Configuring Windows Sound
Right click on the speaker icon in the system tray
Click on “Playback Devices“
click on the “Recording” tab
Double click on “Virtual Audio Cable”
In the “Advanced” tab, set the fidelity to “48,000hz , mono“
Set the default recording device to “Virtual Audio Cable”
Click on the “Playback” tab
Double click on “Virtual Audio Cable”
In the “Advanced” tab, set the fidelity to “48,000hz , mono”
Using SDR# for the first time
RTL-SDR Dongles have a warm up period of 5-10 minutes. During this time there may be a frequency shift of 5PPM or more.
Please open SDR# and select RTL-SDR/USB
Press “Play” in the main window
Feel free to play with SDR# to become accustomed to the user interface.
You can change frequency by dragging on the FFT/Waterfall, by clicking on the top or bottom of numbers, or by putting your mouse cursor over the numbers, and typing a frequency in. Look for FM radio stations, or Weather radio stations nearby and see if you can listen to them, set your mode accordingly WFM for FM radio, NFM for everything else.
If you feel like you might mess up the software, feel free to make a copy and run that one instead.
Once you’re back- Calibration can be set by going into “Configure“
Take note of how some settings may be locked, this is because you are currently running
Press “Stop” in the main window
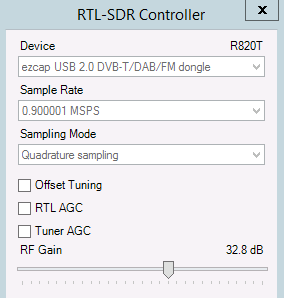
“Device” selects which RTL dongle you will use
“Sample Rate” selects the amount of spectrum you will be able to see. Note that 2.8+ MSPS is not recommended due to audio cutouts, 0.25 is not recommended either due to interference.
Set this value to 0.900001 for optimal performance during trunking. Doing so will show 0.9MHz per fully zoomed out screen. Take note of how this correlates to the MSPS.
“Tuner AGC” can help in situations where you need the best signal possible for long range listening, however it is not recommended for nearby systems due to the possibility of overloading the SDR and causing harmonics in the FFT/Waterfall.
“RF Gain“should be set to a maximum of 32.8dB to avoid overloading.
Initial Calibration
Under “Frequency Correction” you can set the amount of correction needed. If you don’t set this properly, your decodes will not sound as good as they should, or not come in at all.
The PPM varies by unit. Generally around 55-65 in R820T based dongles
To calibrate your tuner you can find a control channel on radioreference, and tune to it inside SDR#. (you can also calibrate using a known NOAA weather frequency)
Notice how changing the PPM slightly changes the frequency, zoom in to get a better look.
Do this for both SDR’s, switch using the “device” drop down menu
Be sure to remember your number, It will be needed for UniTrunker.
DSD depends on cygwin1.dllto run. Download the file here
Put cygwin1.dll and dsd.exe into the same folder
Name that folder DSD
Put the DSD folder into your SDR folder
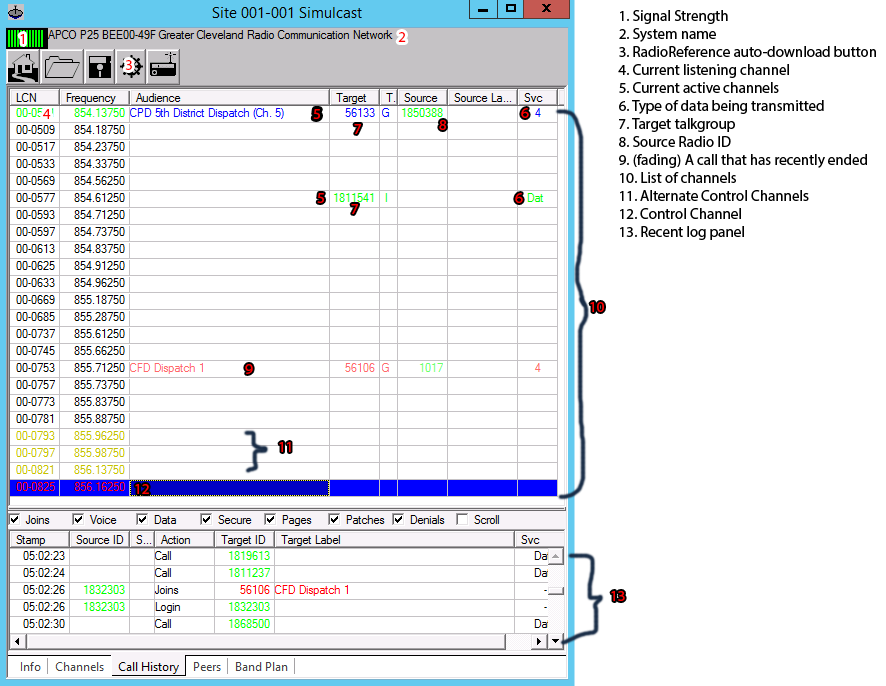
Tour of UniTrunker
Open “uniform.exe“
Select “First time install” and press “Ok”
Take note of the interface, this is the main window
Tabs at the bottom help you navigate
The tab labeled “Options” controls options for the entire program
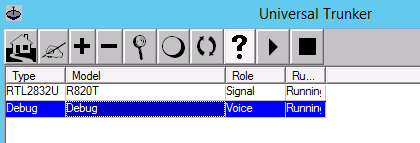
The tab labeled “Receivers” lists the input/output devices you have for listening, or controlling. When configured properly, you will have 2 receivers. A “Signal” and a “Voice“
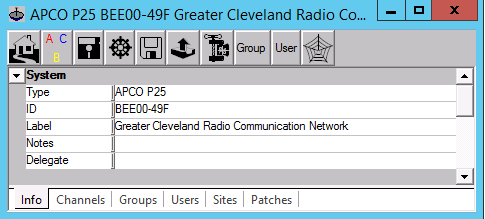
The tab labeled “Systems” will show all radio systems detected by the RTL-SDR
Double clicking on the system will bring up a window that lists all RadioIDs, Talkgroups, frequency channels, transmitter sites, patches, as well as options for the specific system only.
Note: In practice, UniTrunker must always be opened before opening SDRSharp or the RTL device will not show up. If you currently have SDRSharp running, please close both UniTrunker, and SDRSharp, then open UniTrunker only.
Double clicking on the receiver will open the setting panel for the corresponding device.
In the “info” tab set the “RTL Device” to the second device on the list.
Set your “correction” to the PPM you had set from SDR# (e.g. 57.00000)
set “gain” to 300
checkmark “Auto Gain“,
Set your park frequency to the control channel frequency (e.g. 854.16250)
Start the receiver
If your dongle successfully found a control channel, a new window should pop up.
Troubleshooting the control channel (no video)
If you do not see a system pop up, follow these instructions
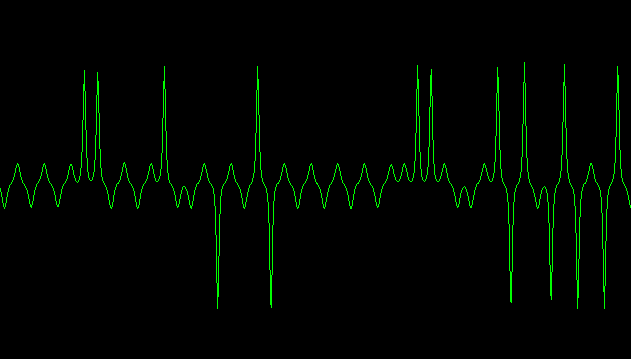
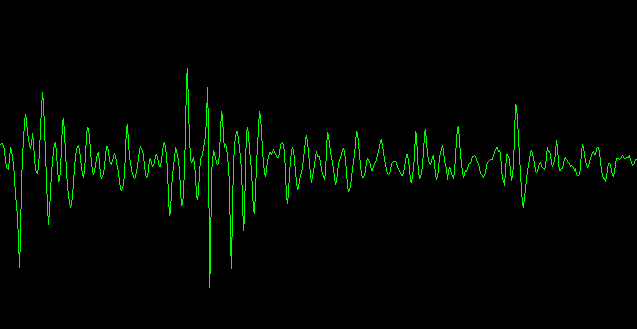
Go into the scope tab and look at the signal coming in.
If it is random and not uniform, you have not found a control channel
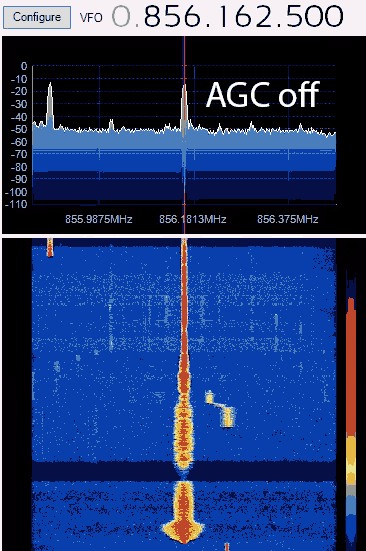
P25 Control channel example scope image
Static, no signal scope image (seen at 21:35)
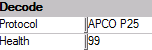
A way you can detect if you found a control channel is in the info tab
This indicates a P25 signal, with a health of 99/100 was found, and is being decoded.
If you still see no systems, go into radioreference and try typing alternate control channels into the park frequency text box. See pic
If you still can not find a control channel, try a different system, try a better antenna, or go close UniTrunker, Open SDR#, and manually browse for a control channel visually.
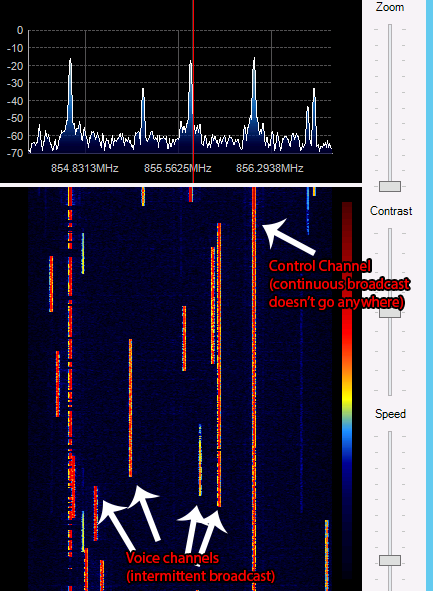
This is what a control channel looks like, move your cursor over that frequency and try that the next time you open UniTrunker
Now that you have detected a system in UniTrunker you can begin filling out, or downloading radioreference data.
This is the download button, if you are a premium radioreference subscriber, you can enter your username and password, and UniTrunker will fetch the latest system info, system name, talkgroup names, etc.
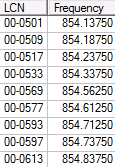
Your frequency list should populate with channels like this.
If it does not, stop the R820T receiver, close the system window. and Start the receiver again.
UniTrunker can decode the control channel, we must now add a second receiver that will allow us to follow voice channels.
In the main UniTrunker Window, Add a Debug receiver (the video shows a bit differently, follow this step instead)
Check the box which corresponds with the type of audio you want to listen to (P25/VSELP/ProVoice)
Now for some math. Take the average of your lowest and highest frequency channel. This is done to ensure that the time it takes for the SDR to switch channels is even. SDRs do take a few ms to change their frequency, and you want to have the lowest latency possible. This will vary by radio system, and needs to be changed when you want to listen to a new radio system.
For example: My highest frequency is 856.16250, and lowest is 854.1375. The average is 855.15. So I would put 855.15 into the box.
In the main window under options enable listen
Press play on the debug receiver.
A new file should be created in ./SDR/UniTrunker called sdrsharptrunking.log
This is the file SDRSharp will read and follow, so we can get voice out of the program.
If you do not see sdrsharptrunking.log, you have not properly installed Visual C++ redist.
Following the Voice channel in SDR#(no video)
Now open SDRSharp in the SDR folder named VOICE
Press Start and duplicate my settings
Now we can configure the plugin
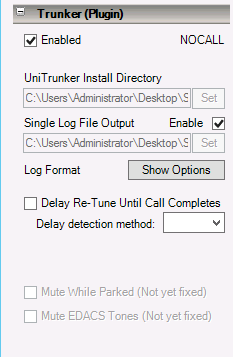
On the bottom of the left settings panel in SDRSharp there is a plugin called “Trunker (Plugin)“
Click set and find the UniTrunker install directory.
Also set Single log file output to that same directory.
Click on show options and in the log style box, type %t %s
Set the Parked Str as NOCALL
Click save
Check both “enable” boxes
Your VFO should match the parked frequency (if there is no call)
Now, when a call appears, UniTrunker will direct the plugin to write sdrsharptrunking.log, which will get read by SDRSharp, and the audio coming out of SDRSharp can be listened to (on analog systems), or for digital, there will be just one more step.
This is the final mandatory step in decoding P25 voice.
Download this batch file, and put it into the same folder with dsd.exe and cygwin1.dll
It will start DSD without having to open command prompt
Make sure your default audio output is still your sound card, and your input is the virtual audio cable
In most cases, this should work without problem
If you want to see what options are available in dsd.exe (to get better decodes) open a command prompt, navigate to the dsd folder, and type in ‘dsd.exe –help‘
Personally I use ‘dsd.exe -l -f1 -mc -u 9‘. But it varies by system.
Congratulations!
That’s it! You should be hearing audio coming from DSD.
Don’t forget you can set call priority and lockout in UniTrunker
Here are a couple extras
Extras
Programs for Streaming
I advise you to make only unlisted streams. I know I can’t stop you from making public streams, but If you like what you hear, and don’t want to lose it. Stay far away from streaming services that allow criminals to tune in. This is the number one reason why cities are going encrypted.
RadioFeed(Free)
Broadwave($)
Programs for recording
Audacity – has a voice activated recording mode to save silence
Log Recorder – based on SOX, written in batch. Puts each conversation into a folder based upon the date, year, in chronological order. Outputs mp3’s named by their TG and RID. Highly configurable
A few months ago I decided to buy a GooPhone i5s (MT6577).
After some searching I noticed that no one had put out a stock AOSP ROM for this device.
The iOS skin was particularly laggy and terribly designed so I went searching for some ROMs from other phones I could port.
Here’s where it gets cool. The MediaTek flashing software allows you to write any data you want to any address of the NAND. This gives you full control over what OS you want to run, like a Nexus device.
The best of both worlds right? Hardware from Apple(almost) and Software from Google.
Anyway, I ended up finding a usable ROM from another iPhone 5 clone, before the iOS skin was added. I originally wanted to build a ROM from source, but that wasn’t going to happen.
I took note of the applications and did my best to recreate a stock Android experience on the GooPhone i5S. The product is ‘I Can’t Believe It’s not AOSP’
It works for the most part, calls, texting, web browsing. Only a few bugs:
Mute switch won’t work
Front facing camera is rotated 90 degrees
Other than that. It runs great, much faster than the stock ROM. It benchmarks at about the same level as the Galaxy Nexus although it only has 512MB RAM. I found the web browsing experience to be surprisingly responsive. Once your app is loaded, this thing flies! Mostly because the graphics chip only has to push 480×854 pixels.
In the end, I learned a lot. Hacking together an Android ROM isn’t that hard, I just had to edit build.props, and patch kernel modules.
Unfortunately, I did end up selling this phone, so I won’t be able to continue development for the ROM. And KitKat is a definite ‘no’ unless someone else releases kernel modules that work for 4.4
Now i’m using a real iPhone 5S, it’s a really nice phone, and you can tell between the two in terms of build quality.